What is a Pull Request (PR)?
A pull request, or PR, is a way to share your code for review. In professional projects, PRs are used to suggest changes and then merge them into the main project.
At CYF, we use PRs mainly as a way for you to submit your work for review and feedback. Think of it like handing in an assignment - the PR is the place where you “submit” your code so mentors and teammates can:
- ✅ See what you changed (new code, fixes, or features)
- 💬 Discuss the changes (comments, suggestions, or questions)
- 👍 Review and provide feedback (approve or request improvements)
For most coursework, merging will not happen. You will update your code based on feedback, learn from the process, and keep practising.
To get the most out of a PR, follow these steps to get clear feedback, show your progress, and learn more effectively.
Preparing a PR Branch
Keeping a branch clean
A clean branch contains only the work you want to share, nothing more. It makes your PR easier to review.
To keep your exercise branch clean:
Create your branch from
main.Keep
mainclean and updated.- Clean -> no changes should be committed to
main. - Updated -> regularly use Sync Fork to keep your repo up-to-date with the upstream repository.
- Clean -> no changes should be committed to
Make only related changes.
- Add or modify only the files in the folder related to the exercise.
- If you accidentally change files for another task, you will need to revert them before submitting your PR for review
Keeping code clean
Clean code makes it easier for you, your teammates, and your reviewers to understand and work with.
Please read the Code Style Guide carefully to learn how to keep your code professional.
Get a second opinion from AI tools
Before submitting a PR, you can use AI tools to review your code, documentation, or explanations.
AI can help you:
- Spot typos, formatting issues, or unclear comments.
- Suggest possible improvements to your code or approach.
- Highlight missing edge cases or potential problems.
Think of AI as a second pair of eyes – helpful for polishing your work.
And don’t worry: using AI is not cheating. You can accept AI suggestions, but only if you
understand them well enough to explain the change. Once you can do that, the learning truly becomes
yours.
Opening a PR
Selecting source and target branches

- (1) Target branch: The branch you want to compare against (normally
mainin CYF’s repo). - (2) Source branch: The branch in your fork where you prepared the files for the exercise.
PR Title
A consistent title format makes pull requests easier to track, search, and review.
📝In CYF Courses
In CYF courses, you can typically find the title format in the PR template.
For example,
Region | Cohort | FirstName LastName | Sprint | Assignment Titlemeans the title should have 5 components separated by a vertical bar character (|)
Region: One ofBirminghamCape TownGlasgowLondonManchesterSheffield
Cohort: In the form<Year>-<Course name>-<Cohort starting month>- e.g.,
25-ITP-Sep
- e.g.,
FirstName LastName: 🙄Sprint:Sprint 1,Sprint 2, …Assignment Title:- Project’s name
- The name of the backlog issue is generally a good thing to use.
- The title (if any) stated in the “How to Submit” section in the backlog corresponding to the exercise
PR Description
The PR description is where you explain what your changes are and why you made them. It helps reviewers quickly understand the context without having to read all the code.
The PR template in CYF courses typically contain the following sections:
1. Self-checklist
The self-checklist helps you remember important steps, shows reviewers you’ve prepared your work, and speeds up the review process - while building good professional habits for real-world projects.
You should only tick items you’ve truly completed, check every box before submitting, and treat the checklist as both your responsibility and a learning tool - ask for help if you’re unsure.
📝In CYF Courses
Complete every task described in the checklist, and mark each one as done.
To check a box in Markdown, write [x] (a lowercase ‘x’ with no spaces inside the brackets)
to mark it as checked.
For example, change
- [ ] My changes meet the requirements of the taskto
- [x] My changes meet the requirements of the task2. Changelist
The Changelist section is a short, bullet-point summary of the key changes in your PR, helping reviewers quickly understand what you did and why.
📝In CYF Courses
Briefly explain your PR by a brief description of your changes.3. Questions
The Questions section lets you highlight parts of your work you’re unsure about, so reviewers can give you targeted feedback and help you learn.
📝In CYF Courses
After Opening a PR
Use labels to communicate the PR status
Reviewers will not check your PR unless it has the right label.
- Add the
Needs reviewlabel to the PR.- For details about how to use labels in a PR, please refer to the Using Labels Guide.
Check for automated feedback
Learning how to respond to automated checks is important, because these kinds of tools are often used in software development work.
At the bottom of the GitHub page there is a summary of automated checks. We don’t use all of these at CYF, but you should be aware of them as they are useful in software development.
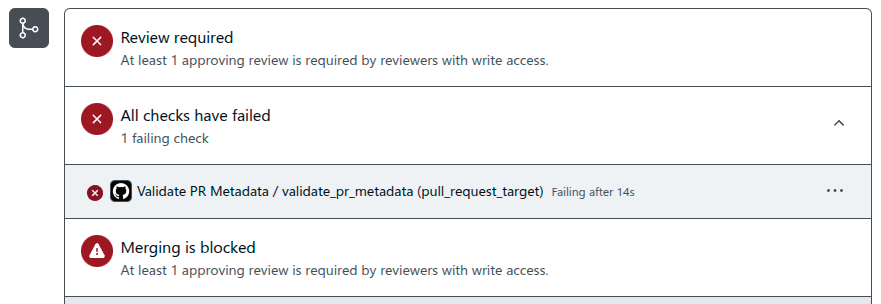
- Review Required This first failed test means no-one has reviewed your PR yet. This is normal when you first submit your PR as no-one has seen it yet. We use labels at CYF to indicate when something is
completeorreviewed, so you can ignore this for now. - All checks have failed This second failed test is the automated testing done by a bot. This needs to be fixed before a volunteer can give you a review. Some tasks might have more than one automated check. Continue reading below to learn how to respond to the bot comments.
- Merging is blocked This third test means you can’t merge your PR. We don’t use merging in our sprint backlog, just making PRs, so you can ignore this third test for now. Can you imagine the problem if we merged every single trainee’s files at once?
Here at CYF we use bots to do some automated checks on your pull request. If a bot sees a problem, it will leave a reply, telling you something needs to be fixed on your pull request. This could mean something is missing from your submission, a problem in the title or description, or an issue with your submitted files.
If you see a comment in your PR from the user called github-actions, here’s what to do:
- Carefully read the comments from the bot, this will explain what you should change
- Do this change and the bot will automatically check your submission again
- After making a change, if the bot leaves another reply, read it again and try to fix the problem
- If you still don’t understand what needs fixing, ask for help on slack
- Once you have resolved the issue, add the
Needs reviewlabel again to your PR
You might also see comments from netlify, these are used in tasks where you need to deploy a website.
Read these comments carefully to see any issues with deployment or accessibility.
Wait for Review
- It may take up to a week (sometimes longer) before someone starts reviewing your PR.
- Your PR will appear on one of the PRs Needing Review pages – please do not post messages like “Please review my PR …” on Slack.
Addressing Reviewer Feedback
Responding to PR feedback is like a conversation: listen, reply thoughtfully, and show that you acted on feedback.
Be respectful and collaborative
- Treat comments as opportunities to learn, not criticism.
- Even if you disagree, respond politely and explain your reasoning.
Acknowledge feedback
- If you agree -> say “Good point, I’ll fix it.”
- If you don’t fully agree -> say “I see your point. Here’s why I approached it this way …”
- Don’t ignore comments – silence can feel dismissive.
Make changes, then confirm
- After addressing a comment, let the reviewer know (e.g., “I’ve updated the variable name as suggested.”).
- This shows you’re actively engaging in the review.
Ask questions if unclear
- If you don’t understand a suggestion, ask for clarification.
- Example: “Could you explain what you mean by simplifying this function?”
Respond Promptly
- Our volunteers have a lot of PRs to keep on top of, so the quicker you respond, the sooner you will be finished with tasks
- But don’t rush through, take the time to make sure your response meets what was being asked
- Try to respond within 2 days of a review, if something is blocking you, ask for help in slack
After you have taken action and replied to your feedback, you should add the Needs review label again, so the reviewer knows you are ready for your submission to be checked again.
When you make changes, make them in the same branch and don’t create a new pull request each time.
💡Writing on GitHub
Markdown is a language for formatting plain text. You can use Markdown syntax, along with some additional HTML tags, to format your writing on GitHub, in places like repository READMEs and comments on pull requests and issues.
To learn how to write in Markdown, embed image, tag users, and other advanced features, visit GitHub Docs - Basic writing and formatting syntax.
Completing a PR
After you get feedback from a reviewer, you may make changes and have a back-and-forth discussion.
When the reviewer is happy that you have understood the task, and you have answered any questions they have, they will add the Complete label to your PR.
Your backlog task is not complete until the reviewer adds this label.
If you spend a long time waiting for the Complete label to be added, check the PR to make sure there are no comments from the reviewer that you missed.
If you think you have answered everything, and you are still waiting, you can ask for help on slack.
You can work on other tasks while you are waiting for reviews or completion on one PR, remember to do other tasks on a different branch.